


TL;DR
- Rooting is useful for Android assessments
- The process is relatively simple
- It will wipe all user data from the device and void any warranty
Introduction
For mobile testing, be it for apps or hardware, having complete control over the device is essential for analysis and vulnerability assessment. Rooting an Android device allows us to gain root privileges, giving us full access to the OS, including access to the private storage of any installed app.
In this blog we will go over the general process of rooting an Android device using Magisk. I’ll be using a generic MediaTek-based Android phone as an example.
There are other ways to root an Android device other than the technique described below, though I prefer to use Magisk as it maintains Google’s SafetyNet which allows us to test applications that rely on Google’s SafetyNet API. One of the key features of Magisk is its ability to hide root access from certain applications that typically block rooted devices, such as banking apps or streaming services. This is achieved through Magisk Hide, a feature that conceals the root status from selected apps
Before we dive in it’s important to note some risks of rooting:
- It will void the device warranty (this old chestnut)
- It could potentially make your device unstable
- Increased attack surface of the device, opening it up to malware (Don’t download dodgy stuff).
Something to note before we root the phone: during the rooting process the bootloader needs to be unlocked, this means we gain the necessary permissions to modify the device’s firmware. This is typically done using a command such as fastboot oem unlock. However, it’s important to note that running this command and accepting the warning message will trigger a security measure that wipes the userdata partition, which contains all application data on the phone including its settings. This is done to protect personal data, as unlocking the bootloader potentially exposes the device to various security risks.
If you want to preserve userdata, there are other methods to unlock the bootloader without triggering the wipe. This involves flashing the partition through specific protocols which are tied to specific chips:
- For Qualcomm devices, you can use EDL (Emergency Download Mode)
- For MediaTek devices, BROM (Boot ROM) mode
- For Unisoc devices, Research Download Mode.
These methods allow the firmware to be flashed while keeping the user data intact, bypassing the automatic data wipe that comes with the normal bootloader unlocking process. In later blogs we will go into rooting devices with the above methods.
General rooting
Prerequisites
- The phone to be rooted
- A copy of the boot image of the phone. The boot.img file is the boot image of the Android device. It contains the kernel and initial ramdisk which are important for the device’s startup process. The kernel acts as the bridge between the hardware and the software managing the device’s resources and processes. The ramdisk contains the necessary files and scripts needed to mount the system partition and prepare the Android operating environment during booting.
When rooting with Magisk, the boot.img file must be modified to allow the system to run with root privileges without altering the system partition. By patching the boot.img, Magisk injects its components into the boot process, enabling root access while keeping the system partition intact. This makes it easier to update as well as helping to pass SafetyNet checks.
Getting the boot.img file requires extracting it from the firmware of your specific device model and software version. As an example the firmware for the google pixel can be downloaded from their official site (https://developers.google.com/android/ota).
At times the firmware file is already unpacked with the boot.img partition accessible within an archive. Other times, like the pixel, it is packaged within a file named payload.bin.
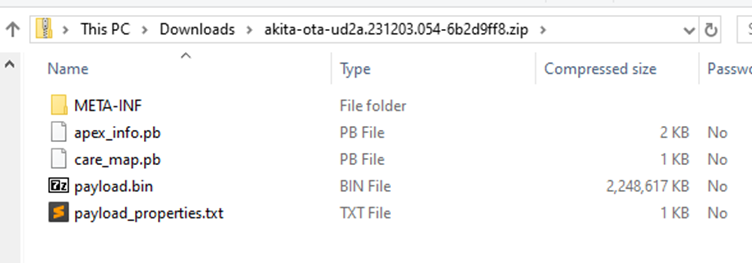
There are many tools to retrieve the boot.img file from payload.bin. One such tool’s name is payload_dumper (https://github.com/vm03/payload_dumper).
(venv) usr@craboo:~$ python3 payload_dumper/payload_dumper.py --out ./ --images boot payload.bin
Processing boot partition................................Done
(venv) usr@craboo:~$ file boot.img
boot.img: Android bootimg, kernel
Download and install Magisk
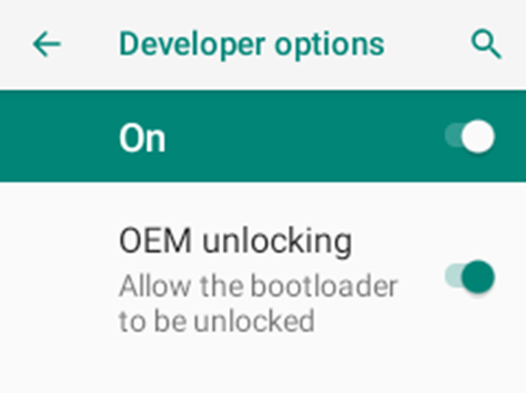
Enable Developer options by tapping Build Number repeatedly then enable OEM unlocking and USB debugging from within Developer options.

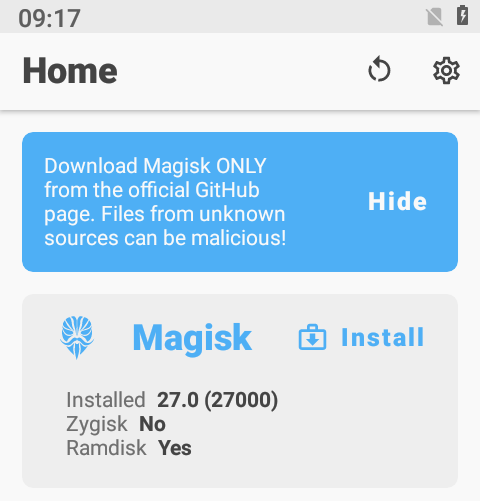
It is recommended to download Magisk from its github page or build it from source yourself.
Install Magisk on the phone:
usr@craboo:~/ adb install Magisk-v27.0.apk
Performing Streamed Install
Success
Push our partition to a device with Magisk installed:
usr@craboo:~/ adb push boot.img /sdcard/Download
boot.img: 1 file pushed, 0 skipped. 143.3 MB/s (16777216 bytes in 0.112s)
Run the Magisk app and then select the image and apply a root patch:
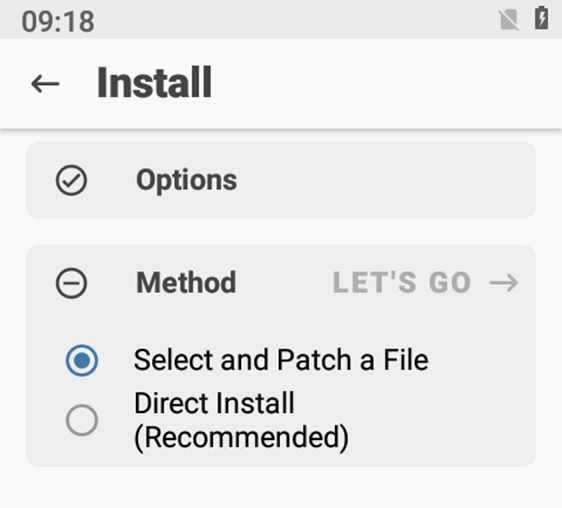
Select the file:
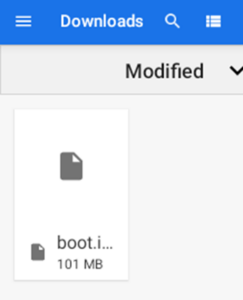
Once Magisk has finished patching the image it will list its location below:
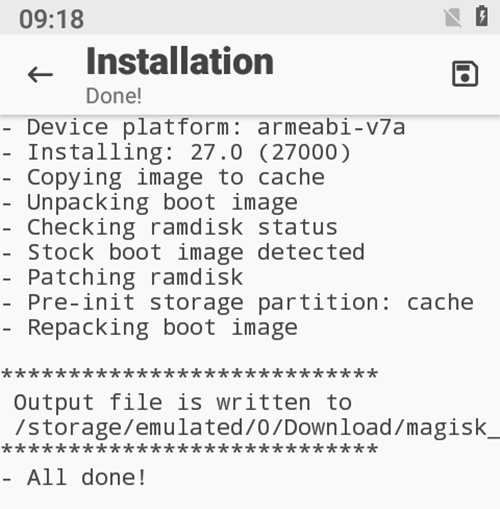
Pull the patched file off the device:
usr@craboo:~/ adb pull /sdcard/Download/magisk_patched-26400_OS0SW.img
/sdcard/Download/magisk_patched-26400_OS0SW.img: 1 file pulled, 0 skipped. 35.4 MB/s (16777216 bytes in 0.452s)
Boot the device into bootloader mode:
usr@craboo:~/ adb reboot bootloader
We can unlock the bootloader with the following command:
usr@craboo:~/ fastboot oem unlock
Note that the unlocking command may vary depending on the device. In some cases, the command might be:
usr@craboo:~/ fastboot flashing unlock
Certain devices may require a key to unlock the bootloader.
Once the unlock command has been issued a warning will pop up on screen saying the personal data will be wiped. This includes the ADB debug settings so that will need to be reenabled when the device reboots.

We can use the following fastboot command to check whether the device is unlocked:
usr@craboo:~/ fastboot getvar unlocked
unlocked: yes
Finished. Total time: 0.003s
Next we will flash our patched image onto the device:
usr@craboo:~/ fastboot flash boot magisk_patched-27000_qR5Fu.img
Sending 'boot' (16384 KB)                          OKAY [  0.516s]
Writing 'boot'                                     OKAY [  1.227s]
Finished. Total time: 1.756s
Then reboot the device:
usr@craboo:~/ fastboot reboot
Rebooting                                          OKAY [  0.002s]
Finished. Total time: 0.053s
When the phone restarts you can get a root shell:
usr@craboo:~/ adb shell
a28f2_v2_s26_xs15_en:/ $ su
a28f2_v2_s26_xs15_en:/ # id
uid=0(root) gid=0(root) groups=0(root) context=u:r:magisk:s0
a28f2_v2_s26_xs15_en:/ #
Note that once the bootloader is unlocked users will encounter a warning message each time the device is powered on. This message alerts users that the device’s security has been changed. This warning message is meant to remind you that the device is in a state that may be different from the manufacturer’s original settings.

Conclusion
Now you know how to successfully root an android device using Magisk. Remember to approach this process methodically, and be aware that it will void warranties and wipe all user data. Keep an eye out for future posts on how to root things.


No Comments yet!